How to Create an Expense Report: 6 Easy Steps
A new small business may not have many expenses to track. But as you grow, your expenses will multiply. You’ll need to track how much you’re spending via an expense report form.
An expense report will also make sure you’re prepared come tax time. Many expenses can be deducted from the total amount owed, according to The Balance.
Creating your own expense report doesn’t need to be daunting. Follow the steps below to learn how to make your own expense report quickly and easily.
Not sure what an expense report is? This article includes a straightforward definition and discusses why expense reports are important for small businesses.
Key Takeaways
- By tracking and categorizing business expenses, expense reports ensure accurate record-keeping and facilitate tax deductions.
- Using templates or expense-tracking software saves time and ensures organized reporting.
- The key elements of an expense report are the date, vendor, category, amount, and receipts for verification.
- Itemizing expenses and separating them by tax-deductible categories aids in financial analysis and compliance.
Table of Contents
- 6 Steps To Create An Expense Report
- What Is on an Expense Report?
- How Do You Create an Expense Sheet?
- How to Create an Expense Report in Excel
- Take the Stress Out of Expense Reporting with FreshBooks
6 Steps To Create An Expense Report
1. Choose a Template (or Software)
To make an expense report, you should use either a template or expense-tracking software. Making an expense report from scratch can be time consuming.
To create an expense report in Excel, PDF, Word or other popular programs, you need to download a template. We also offer an expense report template for free.
Customize the template with your company name, the date range you’re reporting on and your name.
To save time as your business (and number of expenses) grows, you’ll want to upgrade to expense-tracking software. Link your business bank account so that expenses are added as you go. Or use the corresponding app to photograph paper receipts as you get them.
Here is expense report sample generated with FreshBooks:
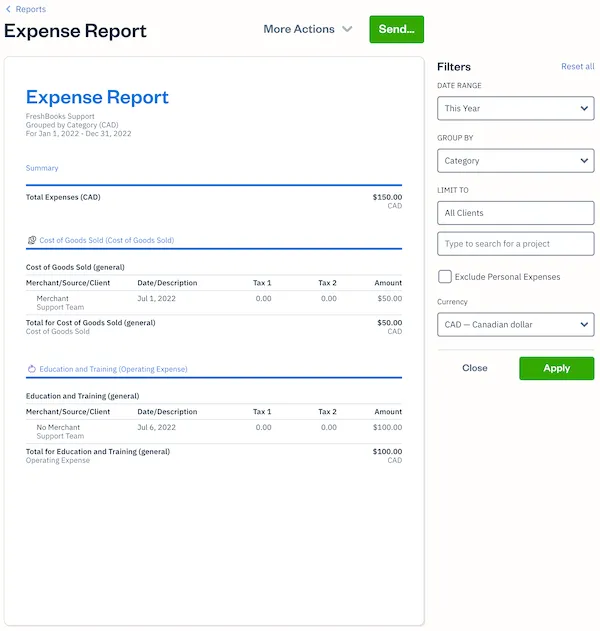
Source: FreshBooks
2. Edit the Columns
FreshBooks’ expense reports have standard columns you can use to adapt your expense report template, if needed. The columns are:
- Date: when the item was bought
- Vendor: where the item was bought
- Client: what client the item was bought for
- Project: what project the item was bought for
- Account: to indicate a client or project
- Author: who bought the item
- Notes: notes to explain the expense
- Amount: cost of the expense
Your columns should reflect common expenses in your business. If you regularly take out clients for coffee or dinner, you need a “travel and meals” column. If you drive a vehicle for business purposes, you need a “car and truck expenses” column, according to The Balance.
Expense reports can separate out expenses by tax category, like rent. This is because the IRS allows businesses to claim some expenses as deductions and asks them to break out the totals by category.
These categories include:
- Advertising
- Car and truck expenses
- Employee benefit programs
- Insurance
- Interest
- Mortgage
- Office expenses
- Pensions and profit-sharing plans
- Rent or lease
- Repairs and maintenance
- Taxes and licenses
- Travel and meals
- Utilities
- Wages
3. Add Itemized Expenses
Add each expense on a new line, being sure to fill out as much information as possible. Be sure to indicate what client and project the expense is for to ensure accurate tracking.
Enter your expenses in chronological order so the most recent expense is at the end. Add the amount of each expense, tax included.
4. Add up the Total
Each category has a subtotal on an expense report and then a grand total of all expenses. You can add this feature to your expense report template, if you like, so you can better see how you’re spending in each category.
Then find the total. Account for any previous over or under payments, if you’re reimbursing an employee.
5. Attach Receipts, If Necessary
Employees submitting expense reports for reimbursement will absolutely need to attach receipts to justify their claims. If printing the expense report, tape the receipts onto a piece of printer paper and photocopy them so you can keep the originals.
If submitting the expense report electronically, scan the receipts using the receipt scanner app and attach them as files. Only then can an employee be reimbursed.
Even if you’re a business owner generating an expense report to analyse spending, it’s essential to keep your corresponding receipts or invoices. If you’re deducting expenses on your taxes, having a backup is necessary in case of an audit, as advised by The Balance. For small business owners, understanding how to invoice as a sole proprietor is crucial; it aids in ensuring proper documentation of your expenses, facilitates tax deductions, and maintains financial transparency.
6. Print or Send the Report
Now your expense report is ready. First, double check your work, especially the figures and the total.
Expense-tracking software can export your report to Excel so you can print or share it more easily.
What Is on an Expense Report?
An expense report is typically a spreadsheet. The following items can typically be found on an expenses spreadsheet:
- The name of the company
- Your name
- Date range or time period
- Columns such as date, description or explanation, code, category columns such as “fuel or mileage”
- A list of expenses
- Subtotal
- Total
- An area for the manager to sign off on the expenses
How Do You Create an Expense Sheet?
An expense sheet is the same as an expense report. To create an expense sheet, follow the steps above.
In short, the steps to create an expense sheet are:
- Choose a template or expense-tracking software
- Edit the columns and categories (such as rent or mileage) as needed
- Add itemized expenses with costs
- Add up the total
- Attach or save your corresponding receipts
- Print or email the report
How to Create an Expense Report in Excel
Creating an expense report spreadsheet in Excel is a simple way to manage your expenses.
You have a couple of options. You can download an Excel expense report template. It has typical business and travel expense categories and automatically calculates the total for you.
You can also create your own Excel spreadsheet from scratch:
- Open a new Excel spreadsheet
- Write the name of your company, time period being tracked and your name in the upper left hand fields
- Leave one row black. Make columns to categorize your expense information. Standard columns, from left to right, include Expense, Type, Date and Amount.
- Itemize your expenses, from the least recent to most recent
- Add up all the expenses and include the amount at the bottom. Write “Total” beside it.
- Print out or email the expense report
Take the Stress Out of Expense Reporting with FreshBooks
Creating and managing expense reports doesn’t have to be difficult. With the right tools and approach, you can stay organized, save time, and ensure accurate tracking for tax purposes. Use FreshBooks for easy expense management for small businesses and eliminate the stress of expense reporting.
Using FreshBooks expense tracking software, you can automate the expense tracking process by linking your bank account directly to it, making it easier to track every expense. The platform allows you to upload receipts, categorize expenses for tax purposes, and generate detailed reports in just a few clicks. Time is saved with customizable templates, and accurate insights are gained with real-time updates. FreshBooks helps you stay organized and focused on growing your business, no matter what you’re doing to prepare for tax season or monitor spending. Try FreshBooks for free today!
RELATED ARTICLES


 How to Prepare Annual Report for Your Small Business
 How to Report Sales Tax: Tax Reporting for Small Businesses
 How to Measure Business Performance in 3 Steps
 How to Prepare a Trial Balance in 5 Steps
 What Is a Trial Balance Report?
 What Is a General Ledger Report?